I am going to explain the source code of two Anki add-ons that I wrote while I was in medical school, in the hopes that it will be useful to someone new to programming who wants to develop Anki add-ons. Before the examples, I also want to provide some background on what you may need to study to write Anki add-ons in general.
It should be noted that these examples are not meant to show Python best practices or even good coding practices (despite a few comments on general program design). They are largely only intended to provide some examples of Anki add-on code with additional context for non-programmers to learn from.
This post condenses the content of three separate posts on this topic. The exact content of the three original posts can be seen in the commit which deleted them.
Background
There are two main topics to learn about to write Anki add-ons:
- Python
- PyQt
Python is a very popular and approachable programming language and PyQt lets you use Qt through Python. Qt (pronounced “cute”) is a C++ library for creating cross-platform graphical user interfaces.
I recommend reading the first 200 pages or so of Python Crash Course, 2nd Edition to learn Python and Create GUI Applications with Python & PyQt5 if you want to read a book about PyQt too.
You should also refer to the official documentation of Python, PyQt, and Qt. Since Qt is a C++ library and not Python, it may take some time to understand how to read its documentation, even once you have a solid grasp of Python. I will explain some of the things to keep in mind when reading the Qt docs with the examples later.
You should also read the official documentation about writing Anki add-ons which has the most up-to-date information on this topic.
The Anki magnifying glass mouse cursor
Let’s take a look at the source code of the Anki magnifying glass mouse cursor. If you install this add-on in the usual way, you can navigate to the source code through Anki. From the Add-ons widget just select the add-on and click the View Files button. Here is the __init__.py file:
from aqt import mw
from aqt.qt import *

config = mw.addonManager.getConfig(__name__)
zoomwidth = zoomheight = config["larger square side length (pixels)"]
width = height = config["smaller square side length (pixels)"]
pos_x_crosshair = config["positive-x crosshair length (pixels)"]
neg_x_crosshair = config["negative-x crosshair length (pixels)"]
pos_y_crosshair = config["positive-y crosshair length (pixels)"]
neg_y_crosshair = config["negative-y crosshair length (pixels)"]
timeout_interval = config["delay to turn off zoom mouse (milliseconds)"]

cursors_pushed_to_stack_per_shortcut = 10

class AnkiMagnifyingGlassMouseCursor():
    def __init__(self):
        self.timer = QTimer(mw)
        self.timer.setSingleShot(True)
        self.timer.timeout.connect(self.reset_zoom_mouse)
        self.cursors_on_stack = 0

    def handle_zoom_mouse_shortcut(self):
        self.persist_zoom_mouse()
        self.timer.start(timeout_interval)

    def persist_zoom_mouse(self):
        i = 0
        while i < cursors_pushed_to_stack_per_shortcut:
            parent: AnkiQt = mw
            point1: QPoint = QCursor.pos()
            point2: QPoint = parent.mapFromGlobal(point1)
            size = QSize(width, height)
            rectangle = QRect(point2, size)
            rectangle.moveCenter(point2)
            pixmap1: QPixmap = parent.grab(rectangle)

            painter = QPainter(pixmap1)
            midx, midy = width/2, height/2
            painter.drawLine(midx, midy-pos_y_crosshair, midx, midy+neg_y_crosshair)
            painter.drawLine(midx-neg_x_crosshair, midy, midx+pos_x_crosshair, midy)
            painter.end()

            enlarged_pixmap = pixmap1.scaled(zoomwidth, zoomheight)
            newcursor = QCursor(enlarged_pixmap)
            mw.app.setOverrideCursor(newcursor)
            i += 1
        self.cursors_on_stack += cursors_pushed_to_stack_per_shortcut

    def reset_zoom_mouse(self):
        while self.cursors_on_stack > 0:
            mw.app.restoreOverrideCursor()
            self.cursors_on_stack -= 1

anki_magnifying_glass_mouse_cursor = AnkiMagnifyingGlassMouseCursor()

action = QAction("Zoom Mouse", mw)
action.setShortcut("Alt+C")
action.triggered.connect(anki_magnifying_glass_mouse_cursor.handle_zoom_mouse_shortcut)
mw.form.menuTools.addAction(action)
There is also a config.json file:
{
"larger square side length (pixels)": 400,
"smaller square side length (pixels)": 200,
"positive-x crosshair length (pixels)": 5,
"negative-x crosshair length (pixels)": 5,
"positive-y crosshair length (pixels)": 5,
"negative-y crosshair length (pixels)": 5,
"delay to turn off zoom mouse (milliseconds)": 500
}
What does this add-on do?
This add-on adds a keyboard shortcut to Anki:
- Alt + C:
- The following happens 10 times:
- A pixel map is made from a small square of the Anki window centered at the instantaneous position of the mouse cursor.
- A small + is drawn onto the center of this pixel map (the crosshairs).
- A second pixel map is made by enlarging the first pixel map.
- The mouse cursor on the screen, and inside the Anki window, becomes the second pixel map.
- The following happens 10 times:
By holding Alt + C, the mouse cursor will always be showing a magnified picture of the screen at the mouse cursor position. When this keyboard shortcut is released, after a short delay, the mouse cursor resets.
If you are testing this add-on and notice that the cursor resets once while holding Alt + C and then stays on afterwards, this may be because of a keyboard shortcut repeat delay, which you can change in your operating system settings.
Python imports
from aqt import mw
from aqt.qt import *
This is just importing parts of Anki into our add-on so that we can use them.
mw is the Anki main window object. An object is an instance of a class. When an object is created using a class as a template, we say that the object was instantiated from the class. The class defines what data and behavior the objects instantiated from it will have.
The Anki main window object’s class is AnkiQt. We will see later that we can ask mw for the Anki collection object.
An important feature of classes and object-oriented programming is inheritance. This allows a class (the child class) to inherit the data and behavior of another class (the parent class). The child class can then add additional data and behavior to what it inherited. The child class can also define its own version of the things it inherits, which overrides them.
AnkiQt inherits from the Qt class QMainWindow, which itself inherits from QWidget. A widget is any element you can see on the screen. Python (and C++) support multiple inheritance, where a class is not limited to having only one parent class. QWidget inherits from both QObject and QPaintDevice. The point is that when you are reading the documentation trying to figure out how to use a specific class, you should inspect closely the more general behavior it has inherited from other classes.
Reading config.json
config = mw.addonManager.getConfig(__name__)
zoomwidth = zoomheight = config["larger square side length (pixels)"]
width = height = config["smaller square side length (pixels)"]
pos_x_crosshair = config["positive-x crosshair length (pixels)"]
neg_x_crosshair = config["negative-x crosshair length (pixels)"]
pos_y_crosshair = config["positive-y crosshair length (pixels)"]
neg_y_crosshair = config["negative-y crosshair length (pixels)"]
timeout_interval = config["delay to turn off zoom mouse (milliseconds)"]
This is generally how Anki add-ons can read in values from a configuration file. The user is able to edit these values from inside Anki. There is one constant in the program that cannot be edited by the user, unless they directly edit it in the source code:
cursors_pushed_to_stack_per_shortcut = 10We will see what this means later.
It is a good idea to define any constant values at the beginning of the program. We could replace every reference to cursors_pushed_to_stack_per_shortcut with the integer literal 10 but this would be considered a magic number.
There are a few reasons why it’s better to not have magic numbers. By defining something in one place and referencing the definition everywhere else, if we have to change it, we avoid having to make changes to many places in the code. The association of a name to the value also helps us remember what the value is.
Registering the actions
anki_magnifying_glass_mouse_cursor = AnkiMagnifyingGlassMouseCursor()

action = QAction("Zoom Mouse", mw)
action.setShortcut("Alt+C")
action.triggered.connect(anki_magnifying_glass_mouse_cursor.handle_zoom_mouse_shortcut)
mw.form.menuTools.addAction(action)
There are two examples here showing how to instantiate an object from a class in Python. anki_magnifying_glass_mouse_cursor is an instance of AnkiMagnifyingGlassMouseCursor, and action is an instance of QAction which we get from PyQt/Qt. The reason why action is instantiated with some arguments and the other object is not has to do with the constructor methods.
The constructor of a class is a method that is called when an object is instantiated from the class, and its purpose is just to set up the object. In Python, the name of the constructor method is __init__. If the constructor takes no arguments, then the object will be instantiated with no arguments.
The QAction class represents an abstraction for user commands. We do three things with it here:
- We specify that this action should be triggered with the keyboard shortcut Alt + C.
- We specify that the
handle_zoom_mouse_shortcutmethod ofanki_magnifying_glass_mouse_cursorshould run when the action is triggered. - We add this action so that it can be triggered from the menu tools.
The AMGMC class and constructor
class AnkiMagnifyingGlassMouseCursor():
    def __init__(self):
        self.timer = QTimer(mw)
        self.timer.setSingleShot(True)
        self.timer.timeout.connect(self.reset_zoom_mouse)
        self.cursors_on_stack = 0
This shows how to start the definition of a class and the constructor. The constructor has a parameter self which represents the object it is constructing.
The constructor generally defines what data an object instantiated from the class has by giving the object attributes. In this case, it is giving it an attribute self.timer which is an instance of QTimer and an attribute self.cursors_on_stack with the integer value 0. mw is available here without needing to be passed in explicitly due to how variable scope works in Python.
QTimer is a Qt class that emits a signal every interval milliseconds. The documentation refers to the QTimer emitting this signal as timing out. The setSingleShot method sets an attribute of the QTimer object that indicates it should only time out once.
self.timer.timeout.connect(self.reset_zoom_mouse)This specifies that the reset_zoom_mouse function should run when the timer emits the signal. Therefore, when the timer times out, the zoom mouse will be reset.
self.cursors_on_stack = 0This is related to the cursors_pushed_to_stack_per_shortcut variable that we defined in the beginning, but we are still not quite at the relevant part to explain what this means.
The handle_zoom_mouse_shortcut method
def handle_zoom_mouse_shortcut(self):
    self.persist_zoom_mouse()
    self.timer.start(timeout_interval)
This is the method that runs when the action we defined is triggered. Calling start on a timer that is already on stops it and restarts it. Every trigger of Alt + C causes the persist_zoom_mouse method to be called and also resets the timer that triggers reset_zoom_mouse.
The persist_zoom_mouse method
def persist_zoom_mouse(self):
    i = 0
    while i < cursors_pushed_to_stack_per_shortcut:
        parent: AnkiQt = mw
        point1: QPoint = QCursor.pos()
        point2: QPoint = parent.mapFromGlobal(point1)
        size = QSize(width, height)
        rectangle = QRect(point2, size)
        rectangle.moveCenter(point2)
        pixmap1: QPixmap = parent.grab(rectangle)

        painter = QPainter(pixmap1)
        midx, midy = width/2, height/2
        painter.drawLine(midx, midy-pos_y_crosshair, midx, midy+neg_y_crosshair)
        painter.drawLine(midx-neg_x_crosshair, midy, midx+pos_x_crosshair, midy)
        painter.end()

        enlarged_pixmap = pixmap1.scaled(zoomwidth, zoomheight)
        newcursor = QCursor(enlarged_pixmap)
        mw.app.setOverrideCursor(newcursor)
        i += 1
    self.cursors_on_stack += cursors_pushed_to_stack_per_shortcut
The important part of this function is the body of the while loop. We’ll look at it line by line.
parent: AnkiQt = mwThis just makes a variable parent also pointing to the Anki main window object. mw is again in scope even though it wasn’t passed in explicitly. Having two variables referencing this object was probably unnecessary (oops).
This is also showing a type hint. It doesn’t do anything except provide us with a reminder that the parent variable is an instance of AnkiQt.
point1: QPoint = QCursor.pos()
point2: QPoint = parent.mapFromGlobal(point1)
Take a look at the documentation for QCursor::pos(). Here is the relevant part:
QPoint QCursor::pos()
Returns the position of the cursor (hot spot) of the primary screen in global screen coordinates.
:: in the Qt documentation means . in Python. This is a static method (which is also mentioned in the documentation) which means it’s called on the class itself, not an instance of the class. The class on the left (QPoint) is the type of the returned value.
The documentation also notes this:
You can call QWidget::mapFromGlobal() to translate it to widget coordinates.
This one is not a static method, so we call it on parent, which references the Anki main window object (an instance of AnkiQt). QWidget is inherited by a lot of other classes in Qt, including QMainWindow, which is the parent class of AnkiQt. So AnkiQt inherits this method from QWidget. Essentially these 2 lines of code are just getting us the position of the mouse cursor in terms of the coordinates of the Anki main window.
The documentation also notes this method is overloaded, which means we can pass it different combinations of argument types. It will determine the correct implementation of the method to use from the types of the arguments you pass it. The reason it is overloaded here is it can also take a QPointF argument, which is different from QPoint in that it defines the coordinate using floating point numbers instead of integers. Many methods in Qt are overloaded so this is another thing to pay attention to as you read the docs.
size = QSize(width, height)
rectangle  = QRect(point2, size)
rectangle.moveCenter(point2)
Here we make a rectangle, which is represented by a top-left corner and a size. Instead of calculating what the top-left corner of a rectangle centered at the point should be, we make a rectangle with its top-left coordinate at that point and then move the rectangle such that the point becomes its center. This may not be the best algorithm to accomplish this but it works.
pixmap1: QPixmap = parent.grab(rectangle)This makes an object which represents a map of the pixels on the screen specified by the coordinates of the rectangle we made.
painter = QPainter(pixmap1)
midx, midy = width/2, height/2
painter.drawLine(midx, midy-pos_y_crosshair, midx, midy+neg_y_crosshair)
painter.drawLine(midx-neg_x_crosshair, midy, midx+pos_x_crosshair, midy)
painter.end()
This draws the crosshairs. Notice how the constructor for the QPainter object takes the pixel map as an argument. One thing to keep in mind about the coordinate system here is that the positive-y direction is defined to be down, which may be the opposite of what you are used to. width and height are the width and height of the square so dividing them by 2 gives the center coordinates of the square. All we have to do is draw short horizontal and vertical lines through that point to make the crosshairs.
enlarged_pixmap = pixmap1.scaled(zoomwidth, zoomheight)This makes a pixel map which is just an enlarged version of the first one.
newcursor = QCursor(enlarged_pixmap)
mw.app.setOverrideCursor(newcursor)
This makes a mouse cursor where the image of it is our pixel map, and then sets the “application override cursor” to be this cursor.
Finally we are at the point to say what the stack related to the cursors is about. From reading the Qt documentation, the cursors are stored on a stack. This data structure is like a stack of books on a table–you can only put a book on top, and you can only take the top book off. setOverrideCursor pushes a cursor onto the stack. cursors_pushed_to_stack_per_shortcut is exactly what it sounds like, and self.cursors_on_stack keeps track of how many cursors are on the stack. By tracking exactly how many cursors are on the stack, we can pop off the exact amount to restore the original mouse cursor.
The reset_zoom_mouse method
def reset_zoom_mouse(self):
    while self.cursors_on_stack > 0:
        mw.app.restoreOverrideCursor()
        self.cursors_on_stack -= 1
This method resets the mouse to its normal state. The restoreOverrideCursor method pops the active cursor off the stack.
The Anki enumeration tool
The second add-on we will look at is the Anki enumeration tool. This add-on is somewhat flawed, but at least one person found it useful:

I think it is a good example for this post anyway.
from aqt import mw
from aqt.qt import *
from aqt.utils import showInfo
from typing import Sequence, Union

class OsceDialog(QDialog):
    def __init__(self):
        QDialog.__init__(self)
        self.setWindowTitle("Enumeration tool")
        self.layout = QVBoxLayout()

        label1 = QLabel("Enter lines below, each line goes into {{c1::line}} in a note")
        self.noteseditor = QPlainTextEdit()
        self.layout.addWidget(label1)
        self.layout.addWidget(self.noteseditor)

        label2 = QLabel("Enter name of deck below")
        self.deck_taker = QLineEdit()
        self.layout.addWidget(label2)
        self.layout.addWidget(self.deck_taker)

        label3 = QLabel("Enter name of note type below")
        self.notetype_taker = QLineEdit()
        self.layout.addWidget(label3)
        self.layout.addWidget(self.notetype_taker)

        label4 = QLabel("Enter title below")
        self.tag_taker = QLineEdit()
        self.layout.addWidget(label4)
        self.layout.addWidget(self.tag_taker)

        label5 = QLabel("Press button below to make notes")
        self.button = QPushButton("Create notes")
        self.button.clicked.connect(self.makeNotes)
        self.layout.addWidget(label5)
        self.layout.addWidget(self.button)

        self.setLayout(self.layout)

    def makeNotes(self):
        notetype_name: str = self.notetype_taker.text()
        model_to_use: Union[None, NoteType] = mw.col.models.byName(notetype_name)
        if model_to_use is None:
            outstring = "Unable to find the specified note type."
            outstring += "\nPlease enter the name of a note type that exists.\nNo cards are being made."
            showInfo(outstring)
            return False

        title: str = self.tag_taker.text()

        deck_name: str = self.deck_taker.text()
        did = mw.col.decks.id(deck_name)
        mw.col.decks.select(did)
        deck = mw.col.decks.get(did)

        notes_content: Sequence[str] = make_osce_notes(self.noteseditor.toPlainText())

        model_to_use['did'] = did
        mw.col.models.save(model_to_use)

        deck['mid'] = model_to_use['id']
        mw.col.decks.save(deck)

        for content in notes_content:
            new_note: Note = mw.col.newNote()
            new_note.fields[0] = title + "<br>" + content
            mw.col.addNote(new_note)
        showInfo("Cards created successfully.")

osce_dialog = OsceDialog()

def showoscedialog() -> None:
    osce_dialog.show()

def make_osce_notes(a: str) -> Sequence[str]:
    string_list: Sequence[str] = a.split('\n')
    out_list = []
    for line in string_list:
        important_line = line
        index_of_line = string_list.index(line)
        if index_of_line == 0:
            out_list.append(f"{1}: {{{{c1::{important_line}}}}}")
        if index_of_line > 0:
            not_important_lines = string_list[:index_of_line]
            outstring = ""
            i = 1
            for notimportline in not_important_lines:
                outstring += f"{i}: {notimportline}<br>"
                i += 1
            outstring += f"{i}: {{{{c1::{important_line}}}}}"
            out_list.append(outstring)

    return out_list

action = QAction()
action.setText("Enumeration tool")
mw.form.menuTools.addAction(action)
action.triggered.connect(showoscedialog)
What does this add-on do?
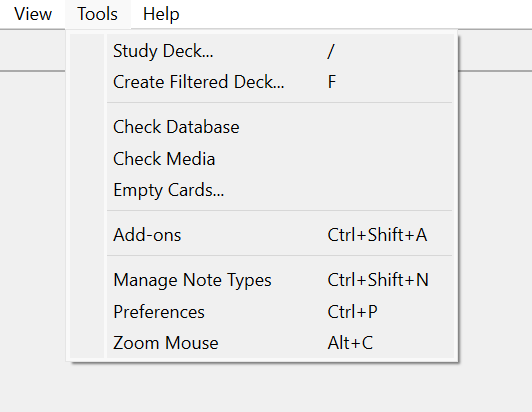
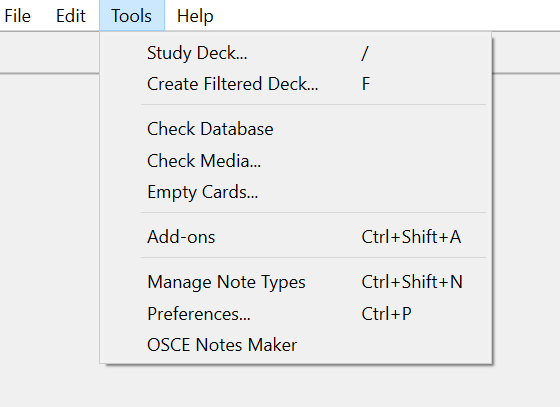
“Enumeration tool” is added to the Tools (this image, and some of the other images, are from an older version of the add-on where it was “OSCE Notes Maker” instead–if you are looking at the live add-on, it will say Enumeration tool):
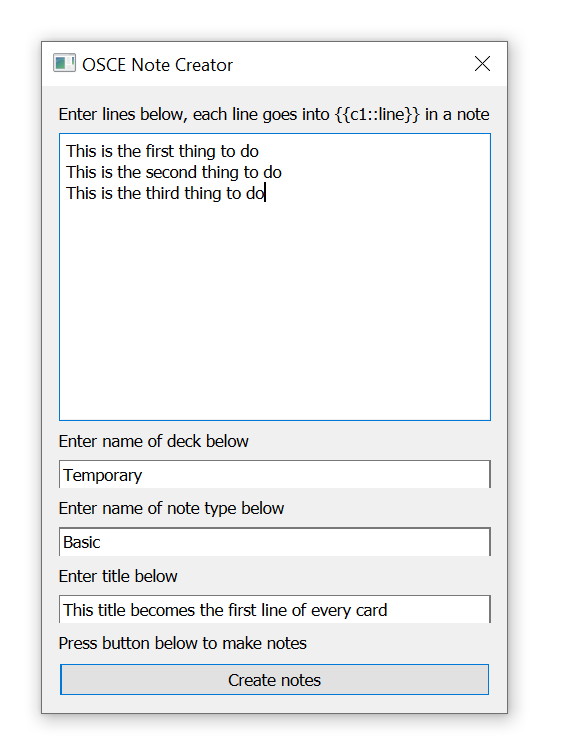
Here is what you get by clicking the button (except the fields would all be empty–I have filled them out here):
There is no deck called Temporary, but there is a note type called Basic. Clicking the Create Notes button creates a Temporary deck and makes three notes:
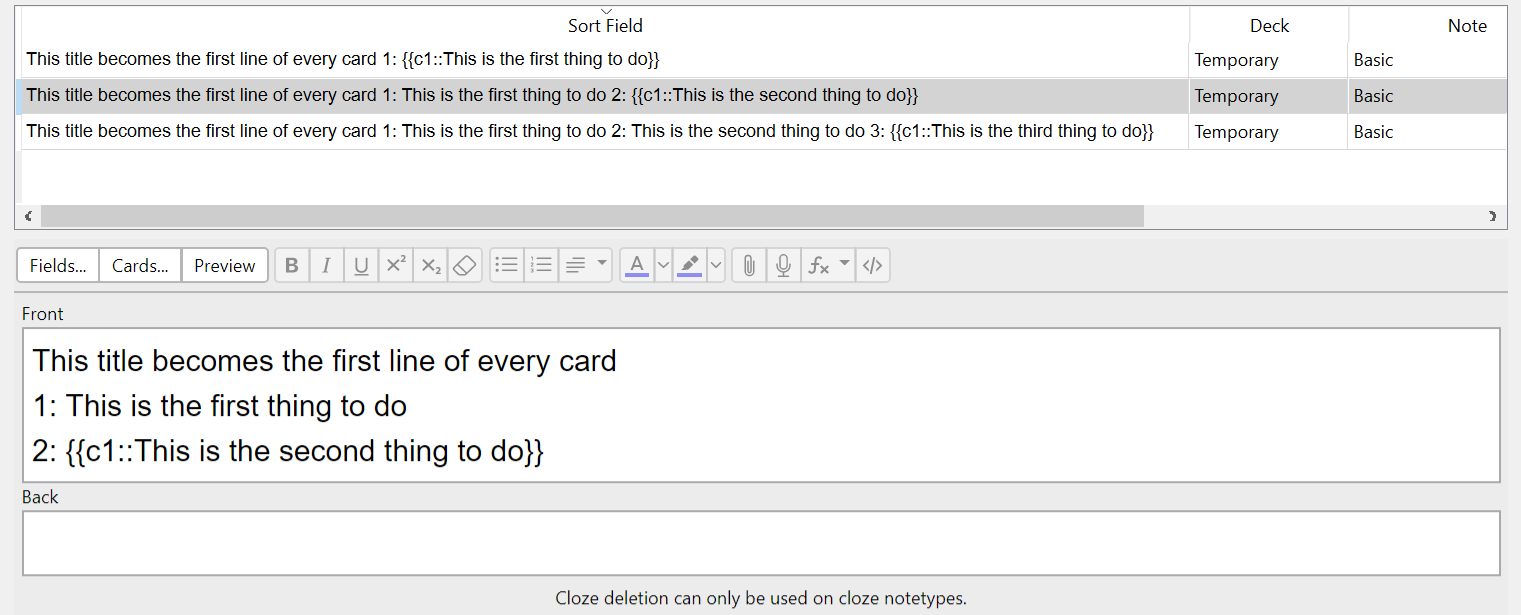
The Basic note type isn’t a cloze deletion type so these notes won’t work, but the more serious problem is that the information is repeated over three notes. Each of the three notes creates one card. What you actually want is one note creating three cards–this is the biggest flaw with this add-on.
Because the Anki data structure is not being used correctly, if you make an enumeration with N steps, you have N notes each with N steps instead of 1 note with N steps. In the worst-case scenario, if you wanted to edit all N steps, you have to edit N steps for N notes.
Even with bulk note editing, the Anki notes made by this add-on are hard to maintain. You could probably get the same functionality without this problem by creating a custom note type or card types for enumerations.
Registering the action
Just like with the magnifying glass, we make an action, add it to the Tools, and connect it to a function:
action = QAction()
action.setText("Enumeration tool")
mw.form.menuTools.addAction(action)
action.triggered.connect(showoscedialog)
The showoscedialog method
I really should have given this function a better name in snake_case (oops).
osce_dialog = OsceDialog(mw)

def showoscedialog() -> None:
    osce_dialog.show()
This makes an instance of the OsceDialog class–the superclass of OsceDialog is QDialog, which is another Qt class which inherits from QWidget, which is where show comes from. This method just causes the widget, and any of its child widgets, to be shown.
The OsceDialog class and constructor
class OsceDialog(QDialog):
    def __init__(self):
        QDialog.__init__(self)
        self.setWindowTitle("Enumeration tool")
        self.layout = QVBoxLayout()

        label1 = QLabel("Enter lines below, each line goes into {{c1::line}} in a note")
        self.noteseditor = QPlainTextEdit()
        self.layout.addWidget(label1)
        self.layout.addWidget(self.noteseditor)

        label2 = QLabel("Enter name of deck below")
        self.deck_taker = QLineEdit()
        self.layout.addWidget(label2)
        self.layout.addWidget(self.deck_taker)

        label3 = QLabel("Enter name of note type below")
        self.notetype_taker = QLineEdit()
        self.layout.addWidget(label3)
        self.layout.addWidget(self.notetype_taker)

        label4 = QLabel("Enter title below")
        self.tag_taker = QLineEdit()
        self.layout.addWidget(label4)
        self.layout.addWidget(self.tag_taker)

        label5 = QLabel("Press button below to make notes")
        self.button = QPushButton("Create notes")
        self.button.clicked.connect(self.makeNotes)
        self.layout.addWidget(label5)
        self.layout.addWidget(self.button)

        self.setLayout(self.layout)
This class represents the enumeration creation window and also implements its functionality.
class OsceDialog(QDialog):
    def __init__(self):
        QDialog.__init__(self)
This shows how to define a class that inherits from another class. The first thing the constructor does is call the constructor of the parent class, which is necessary to set up the object correctly.
self.setWindowTitle("Enumeration tool")This sets the title of the window. It’s similar to the <title> element in HTML, which is the text you see in the browser tab. For example, the title of this web page is “How to write an Anki add-on (case studies)” which you should be able to see in the tab if you are using a modern web browser on a computer.
self.layout = QVBoxLayout()Here we are giving the object a layout attribute which is an instance of QVBoxLayout, a Qt class which is used to line up widgets vertically.
label1 = QLabel("Enter lines below, each line goes into in a note")This makes the first label.
self.noteseditor = QPlainTextEdit()This attribute is the multiline text input field where we enter the steps of the enumeration.
self.layout.addWidget(label1)
self.layout.addWidget(self.noteseditor)
This adds the label and multiline text input field we just made to the layout.
label2 = QLabel("Enter name of deck below")
self.deck_taker = QLineEdit()
self.layout.addWidget(label2)
self.layout.addWidget(self.deck_taker)

label3 = QLabel("Enter name of note type below")
self.notetype_taker = QLineEdit()
self.layout.addWidget(label3)
self.layout.addWidget(self.notetype_taker)

label4 = QLabel("Enter title below")
self.tag_taker = QLineEdit()
self.layout.addWidget(label4)
self.layout.addWidget(self.tag_taker)
All of this is pretty similar to what we already saw except for the QLineEdit class, which is just a single line text input field.
label5 = QLabel("Press button below to make notes")
self.button = QPushButton("Create notes")
self.button.clicked.connect(self.makeNotes)
self.layout.addWidget(label5)
self.layout.addWidget(self.button)
The new thing here is the button class and the line specifying that clicking the button will trigger the makeNotes method of the object we are constructing.
self.setLayout(layout)The setLayout method works for any QWidget and takes an argument of type QLayout. QLayout is inherited by QBoxLayout, which is inherited by QVBoxLayout, so this works. The argument becomes the layout manager for the receiver of the method, which is the object we are constructing.
The makeNotes method
def makeNotes(self):
    notetype_name: str = self.notetype_taker.text()
    model_to_use: Union[None, NoteType] = mw.col.models.byName(notetype_name)
    if model_to_use is None:
        outstring = "Unable to find the specified note type."
        outstring += "\nPlease enter the name of a note type that exists.\nNo cards are being made."
        showInfo(outstring)
        return False

    title: str = self.tag_taker.text()

    deck_name: str = self.deck_taker.text()
    did = mw.col.decks.id(deck_name)
    mw.col.decks.select(did)
    deck = mw.col.decks.get(did)

    notes_content: Sequence[str] = make_osce_notes(self.noteseditor.toPlainText())

    model_to_use['did'] = did
    mw.col.models.save(model_to_use)

    deck['mid'] = model_to_use['id']
    mw.col.decks.save(deck)

    for content in notes_content:
        new_note: Note = mw.col.newNote()
        new_note.fields[0] = title + "<br>" + content
        mw.col.addNote(new_note)
    showInfo("Cards created successfully.")
We saw above that this method will be called when clicking the button.
notetype_name: str = self.notetype_taker.text()This just grabs the text input entered for the note type and assigns it to a variable.
model_to_use: Union[None, NoteType] = mw.col.models.byName(notetype_name)The first thing to notice is the use of a union type in the type hint. model_to_use can be None if no note type is found or it can be an instance of the Anki class NoteType.
With this we are also starting to get out of the Qt stuff and into the Anki data structure. mw.col is the Anki collection object–the official Anki add-on writing documentation notes how useful this is. Here it is giving us access into the note types and also letting us ask for one by name. In the Anki source, model is sometimes another term for note type.
if model_to_use is None:
    outstring = "Unable to find the specified note type."
    outstring += "\nPlease enter the name of a note type that exists.\nNo cards are being made."
    showInfo(outstring)
    return False
The showInfo function is a nice helper that does this:

So if the user enters something for the name of a note type which is not a note type in their Anki collection, they get this message.
title: str = self.tag_taker.text()

deck_name: str = self.deck_taker.text()
These lines are just getting the title of the cards to create and name of the deck to put them in in the same way as we got the note type name.
did = mw.col.decks.id(deck_name)Here we are again asking the Anki main window for the collection object. The collection object’s decks method returns an instance of the DeckManager class. This has a method id which, as we see here, can take a deck name string argument and return the id of that deck.
mw.col.decks.select(did)This finds a deck in the collection by id and selects that as the current deck.
deck = mw.col.decks.get(did)Now we have the current deck assigned to a variable. I think this object is an instance of DeckDict.
notes_content: Sequence[str] = make_osce_notes(self.noteseditor.toPlainText())This is where the input from the multiline text field gets converted to the contents of the notes–we will look at the make_osce_notes function later.
model_to_use['did'] = did
mw.col.models.save(model_to_use)
This sets the deck id of the note type and persists the update to the database.
deck['mid'] = model_to_use['id']
mw.col.decks.save(deck)
I had to also set the model id of the deck to be the model’s id.
I think this was probably necessary due to the default way Anki decides what model to use and what deck to put new notes in. It may be that the model used is determined by the current model of the selected deck and the deck that notes are added to is determined by the last deck used by the model.
for content in notes_content:
    new_note: Note = mw.col.newNote()
    new_note.fields[0] = title + "<br>" + content
    mw.col.addNote(new_note)
This is where the notes are made. As some evidence for what I was just explaining about why it may have been necessary to set both the deck id of the model and the model id of the deck, note how we don’t specify here what model to use for the new note or what deck to put it in. The <br> is the HTML line break element. Here it prevents the title and first line of the content from being on the same line.
Reading the source, it looks like newNote is deprecated and new_note (a method called new_note–not the variable I called new_note above) should be used instead. Both are methods of Collection (the Anki collection object’s class) but it looks like new_note takes the model to use as an argument instead of just defaulting to the current model of the selected deck.
The make_osce_notes method
The details of this function aren’t important. It takes an input like "1\n2\n3" and returns a Python list like ["1: {{c1::1}}", "1: 1<br>2: {{c2::2}}", 1: 1<br>2: 2<br>3: {{c1::3}}"] which becomes the notes_content in makeNotes. The a parameter should probably have a more descriptive name.
def make_osce_notes(a: str) -> Sequence[str]:
    string_list: Sequence[str] = a.split('\n')
    out_list = []
    for line in string_list:
        important_line = line
        index_of_line = string_list.index(line)
        if index_of_line == 0:
            out_list.append(f"{1}: {{{{c1::{important_line}}}}}")
        if index_of_line > 0:
            not_important_lines = string_list[:index_of_line]
            outstring = ""
            i = 1
            for notimportline in not_important_lines:
                outstring += f"{i}: {notimportline}<br>"
                i += 1
            outstring += f"{i}: {{{{c1::{important_line}}}}}"
            out_list.append(outstring)

    return out_list
Conclusion
I hope this article helps you write your own Anki add-ons. If I described something incorrectly, please let me know. Some final advice: if you get frustrated while programming your add-on, sleep on it or go for a walk. Consider it an opportunity to learn when you come back.